

As an architectural and also landscape photographer, I always do a lot of research before actually going out shooting. The research is ideally online combined with real life on-location research, but the latter is not always possible. All you can do then is do your research online, taking full advantage of Google Maps, Street View and of course looking up tips on the Internet from other photographers.
But it’s my experience that not everyone is keen on sharing their knowledge or their favorite photography locations. Let alone share more detailed information on how to photograph the object at hand, once you’re on location. I’ve frequently read and heard about well known photographers who have photographed locations that are completely unknown, except for a few insiders, and do everything possible to keep their locations a secret. If you’re the type of photographer who rely solely on the accessibility, or rather, lack there-off, or remoteness of specific locations for the authenticity and originality of your photographs then it simply means, you’re a good location scout, but I surely wouldn’t say you’re a great photographer.
Great photographers don’t need remote locations to take great photographs, they would look in and around their own environment, if needed, and can find ample inspiration and authenticity there, because they’re able to find it anywhere. The uniqueness of a location is not decisive, not even close, for the artistic or photographic value of a photograph. The artist’s interpretation is.
The greatness of such photography masters as Henri-Cartier Bresson, Ansel Adams or Edward Weston to name a few, doesn’t stem from the fact they had access to unusual locations or objects, nor where they secretive about it, or in Bressons genre, an unusual moment, but in their ability to see the unusual in a location, object or moment. So I go against all those photographers who like to be secretive about their locations: I will share mine with all technical details and tips and tricks. Nothing secretive about it, because the thing that’s really valuable, the way the individual artist interprets and sees it, is the only decisive and valuable aspect in art and fine art photography. And if you want to know what that interpretation is, then just look at my photographs. You may like it, or not, but it derives from my imagination, not from a secret spot.
I will share a few locations on a regular basis depending on the popularity of a series like this. If there aren’t enough interested readers, I’m going to discontinue this series. I will start off with The Zeeland Bridge in the Netherlands and the Chrysler Building in New York. I aim to only pick one building per city or structure per area.
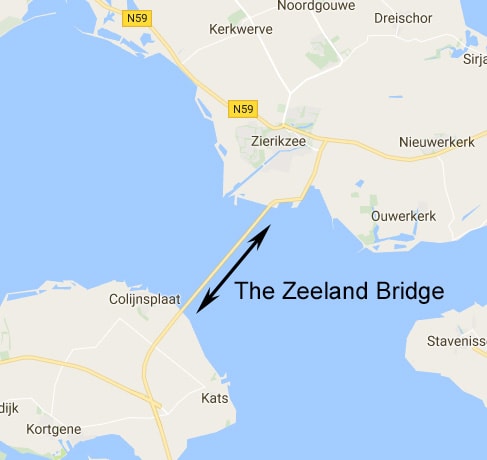
The Zeeland Bridge
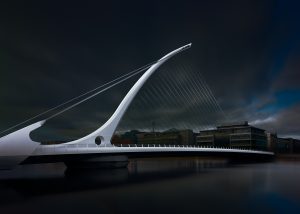
The Zeeland Bridge area has always been one of my all time favorite photography locations and I’ve photographed this bridge many times which resulted in this bridge featuring in a BMW 6 series worldwide advertising campaign in 2010 and winning second prize at the International Photography Awards 2010. The Zeeland bridge is the longest bridge in the Netherlands with more than 5km (3+ miles) of total length.

Where And When To Shoot
Where Is It Located And How To Get There
The Zeeland Bridge is located in The Netherlands in the province of Zeeland between the small towns of Colijnsplaat and Zierikzee. It’s 138 km to the south from Schiphol Airport in Amsterdam and it’s recommendable to access it by car. It will take you 1.5 hour to get there by car if there’s not too much traffic between Amsterdam and Rotterdam. Between Rotterdam and the province of Zeeland it’s relatively quiet. If you come from the north and head south, then cross the bridge to the south side of the bridge from Colijnsplaat. The north side of the bridge is not favorable, see more in the section on where do I shoot.

Where Do I Park?
When you’ve crossed the bridge turn right at the traffic lights and immediately right again to follow a smaller secondary road. You will then get to the underside of the bridge with a few parking spots. The only people you’ll see there are people strolling alongside the water, fishermen and of course photographers.
Where To Shoot
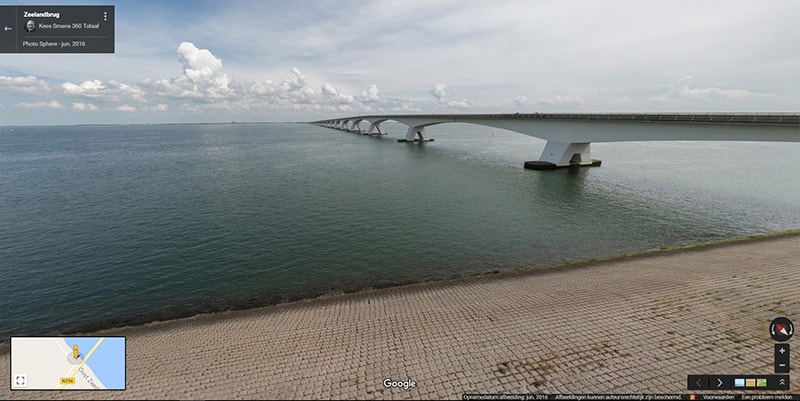
If you’re on the south side of the bridge, in the small town of Colijnsplaat, you will have the most favorable side of the bridge:
- You will have the sun in your back most of the day, unlike from the north side where you are shooting into the sun most of the times.
- The south side of the bridge is the ‘cleanest’ and most photogenic part of the bridge. The north side has a specific structure to allow the bridge to open and close on that side of the bridge: it is too massive and takes away from the visual balance in your image.
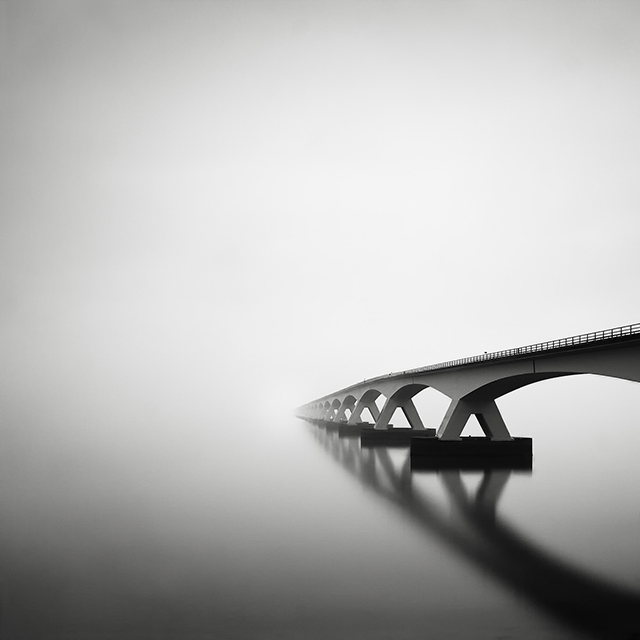
After walking over the dike on the left you are presented with this view:
You can choose a spot left or right from the bridge. My hands down favorite spot is the left side of the bridge because the bridge tends to move towards you instead of away from you which makes it more interesting from a composition point of view. Don’t go too far from the bridge but don’t stand too close either. Notice the first more massive bridge support: if you stand too close, that support will be too dominant. Move away from it so it doesn’t look too bulky and has a negative impact on the visual balance. You can get closer to the water to a lower position, if you like to change the point of view. That way you can eliminate the pavement of the dike but be careful, it can be very slippery there especially when it is raining or when it has just been high tide.
Be sure to dress warm as it can get quite windy. And therefore also make sure you bring a solid and sturdy tripod because you wouldn’t be the first to see your tripod with camera get smacked to the ground due to a sudden wind gust.
When To Shoot
Since the sun will mostly be moving behind your back from east to west on the south side, the time of day isn’t too critical. Checking the tide in advance is more important: too low tide and you can see all the small rocks and mess in the water which makes it quite busy. If you want to include parts of the black concrete lower support of the bridge, then too high tide isn’t favorable either. Of course check the weather too. Like any landscape photographer knows, a cloudy sky with fast moving clouds and no blue sky provide the best lighting conditions with soft light. The Zeeland bridge is in an area where it can be very foggy quite often, especially from November to February. That is my favorite weather condition.
How To Shoot
How to shoot the bridge is of course very personal. I for instance, like to shoot for long exposures and I would bring my 16 stops ND Firecrest filter. But there are a few recommendations that are independent of the visual style.
A wide angle lens is the best lens for this location so you can get up-close. If you’re shooting with a cropped sensor then a focal length between 17 and 25mm will give you the best results in terms of effective composition. If you shoot with a full frame camera then you will find that anything between 24 and 40mm gives you enough flexibility to move around close to the bridge. In any case, and like I mentioned earlier, the best way to shoot the bridge is from up-close without getting too close. Getting too close will result in including the first massive bridge support that will look very bulky and dominant in your photo. You can go up-close and shoot very wide and then crop out that support in post production. If you don’t like to waste your valuable pixels then stepping away a few meters to the left and aiming for one of the last bridge supports on the other far end of the bridge, somewhere half-way your frame, will make for a good composition and will put the first bridge support (almost) out of your frame. I’ve cropped out the first bridge support to go with a square crop and still have a minimalistic composition by visualizing the square crop on my LCD and positioning the far end of the bridge a bit left from the middle of the frame.
Moving away farther from the bridge and shooting with longer lenses is of course an option, but keep in mind you will loose the depth and dynamic of the bridge and the bridge will look more rectilinear and less diagonal than from up close.
Tip: if you go too low then the bridge can look very massive in your photo, if that’s what you like then go for it. My ideal spot — see foggy bridge photo — is to step down the dike around one meter (3ft). You’re standing relatively high then, leaving enough sky above the bridge, but not too high.
The Chrysler Building
The Chrysler Building is not only an iconic New York City building but also one of the most recognizable buildings in the world. It’s also a favourite subject of many photographers and cinematographers. The Chrysler Building, built in 1930, is the epithomy of art-deco architecture and once stood as the tallest building in the world, only to be surpassed by the Empire State Building in 1931.
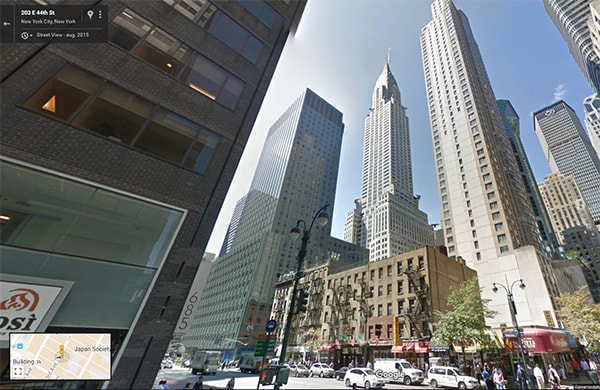
With all the highrise and many skyscrapers that New York is so famous for, it also presents a problem in finding a good vantage point for architectural photography. Isolating a building from street level, is almost impossible unless you are pointing your camera right up to the sky. A more ideal vantage point is if you have access to a rooftop with an unobstructed view on the Chrysler Building. There area a few locations on street level that gives an you almost unobstructed view on this building. I have found one, but you need very specific lenses to be able to shoot it without any distortion.

Where And When To Shoot
Where Is It Located And How To Get There
The Chrysler Building is located at 42nd and Lexington Ave in New York City. The best way to visit is using the 4, 5, 6, 7 or S train and getting off at Grand Central Terminal. If you exit GCT at 42nd Street you can see its beautiful and characteristic crown. It’s at walking distance from Grand Central Terminal and it’s impossible to lose sight of it.
Where To Park
I wouldn’t go by car, but if you do, good luck finding a parking spot! Taking the subway is the easiest and fastest. Or else take a cab and let the driver drop you off at Grand Central Terminal or at the Chrysler. I prefer to approach a building from a distance, walk around it from a viewable distance and to take in its view while walking towards it, instead of being at the base of the building at ground level where you can’t see the essence of this building, unless you’re a giraffe. It gives you time to study the building. Alternatively, if you walk down 42nd Street from Bryant Park or the Public Library towards Grand Central Terminal, you will see this majestic building growing more impressive with every step you take. Plenty of photography opportunities on the way. But not always the most ideal vantage point for an architectural black and white photographer. The ideal vantage point is described in the next section.
Where To Shoot
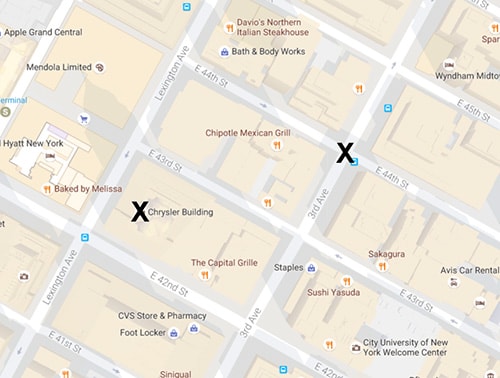
As indicated, you can basically photograph the Chrysler Building from anywhere in New York. For the photo that I wanted, however, straight forward and up-close with an almost unobstructed view, like in the photo shown at the intro of this article, I took the shot from the corner of 44th and 3rd, standing in front of one of New York’s well known pharmacies. Getting closer was impossible, I already reached the limit of the 17mm tilt shift lens I was using and that had a maximum upwards shift. Moving farther away would leave you with a partial view of the Chrysler Building. Simply put: I could only take the shot from that corner.
When To Shoot
That depends, but in the afternoon, standing on that specific corner, you will find the sun slowly moving behind the Chrysler Building. It gives the building a beautiful halo, as if it’s radiating and I could use that in my photograph to enhance my concept of applying art deco visual styles in the black and white post processing. But there’s just a limited time slot until the sun will rear its beautiful head again, and makes it less favorable to photograph for architectural photographers. Shooting it in the morning will give you more chances at a good result.
How To Shoot
Keeping in mind that how to photograph this building is dependent on your preferred visual style, but if you want to shoot it up-close, undistorted and with an almost unobstructed view, then shooting it from the corner of 44th and 3rd is one of a very few locations that you can pull this off. It comes with a price though, literally. It’s impossible to photograph this building from that corner if you don’t have a wide angle lens of at least 17mm, preferably wider. But a 17mm wide angle lens without tilt or shift, will still leave you with a distorted view and you can’t have the entire building in your frame without tilting your camera. A wider lens will result in more objects in your frame than is wished for and on top will make the Chrysler building look smaller and with distorted lines. Moving away from the corner of 44th and 3rd, to shoot it with a 24mm Tilt shift lens for example, will make the Chrysler Building disappear behind other buildings. The only right lens for a shot like this, if you shoot with a full frame camera, like with my Canon 5D S/R and not medium format, is the 17mm tilt-shift lens. I used the Canon 17 TS-E lens. You will have to rotate your camera to portrait orientation and shift the lens upwards to its maximum position. You can’t shoot it in landscape orientation. That will leave you with barely enough room between the top of the building’s spire and the top edge of the frame. But that was perfect for my style. I didn’t need to apply any perspective correction in post processing. If you shoot this with long exposure photography techniques, like I did, then it becomes slightly more complicated since you will have to use a filter holder like the Lucroit 165mm filter holders to fit the bulgy 17mm lens.
No need to worry about permits, security guards or other law enforcement officers: you don’t need a permit, you’re free to shoot public buildings from public ground. The sidewalk is wide enough to set up your tripod and to not obstruct the sidewalk. Because that’s the most important rule for shooting in the streets of New York: you can set up your tripod at any public space as long as you don’t obstruct it and you’re not standing in anyone’s way.
A Few More Thoughts
My photography location tips are highly personal and based on my own experience. If you have additional location tips for the locations I’ve described, then feel free to add your comments below. Don’t be afraid to share your secret tips, it will result in some competition indeed, but authentic artistic vision and interpretation will always remain unique. I would love to see photos that will render my photographs obsolete. If you want to know more on architectural photography then I can highly recommend the eBook From Basics to Fine-art, that I co-wrote with Julia Anna Gospodarou and if you want to know more on shooting long exposure photography in the field, with as model the Zeeland bridge in this article, and black and white photography post-processing then I can highly recommend the 2-video pack on long exposure photography and black and white post processing that has a 60% extended Black Friday discount until December 4, 2016.
4 Responses
Very interesting on how and what. Especially on the bridge. This is the kind of stuff that is really helpful much more so than what filter to use or camera setting to use, etc.
Jack Kent Cooke (died 1996) bought the Chrysler Building “because it was beautiful…and it was for sale,” he told a friend who asked him why. He discovered that the building had been prepared for lighting in its crown but bulbs hadn’t been installed. So he did. And he would look with pride at the view when dancing and dining at, I believe, The Rainbow Room. His foundation in Virginia has a “Chrysler Room” with Mr Chrysler’s dining room table and chairs. And numerous photos and paintings of the icon.